Our friend JB who is an avid DIYer and chronicles his adventures at Building Moxie, recently spent a weekend with his daughter transforming a typical garbage can into a home recycling bin. Not only does this project allow ample time for teaching and learning it also makes a healthy impact on the environment which is a great lesson for kids. Thanks for sharing JB!
Up until a few weeks ago we had been using Glad’s Tall Kitchen Recycling Bags. You know — the blue ones, and just sitting them right out on the curb. Then suddenly, and without notice, Baltimore City stopped picking them up. Friday evening, I’d roll home and find them still sitting there, in a neat row, just as I had left them in the morning.
A few Fridays passed before I made the call, a call into Baltimore City’s One Call Center. It appears that our charming city had stopped collecting plastic bags as part of their single-stream recycling program. And since our “container” was, well, a plastic bag, we were simply out of luck.
In need of another option, my wife did do a quick pass for a recycling specific (exterior) bin at the nearest home centers. Again, no luck. A few more days passed before we learned we could actually purchase cans directly from the City. A bright yellow and clearly-marked 25-gallon recycling container is available for $12; the corresponding lid – another $3.
It wasn’t so much the cost of the cans that got me, I certainly liked the yellow and they seemed sturdy enough, it was the specific lengths that I had to go to get one. (They are only available at very specific locations, during very specific times)
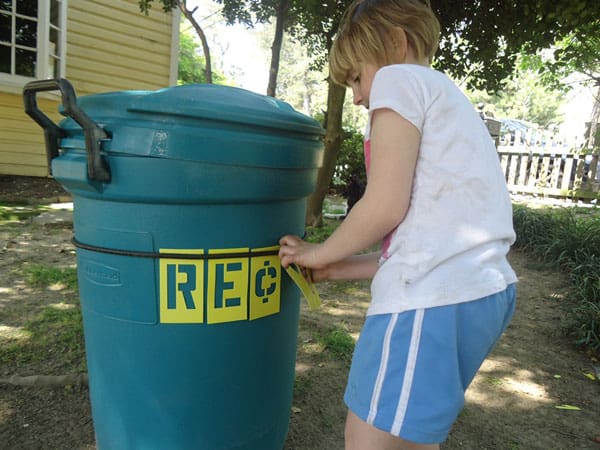
Another week later, when I almost effortlessly came across a Rubbermaid 30-Gallon, I decided to go a different route. And finally this past weekend, in between laying tile in our pantry and a typical load of springtime yard work, my youngest daughter (Eva) and I turned this old and (ironically) discarded trash can into a recycling bin.
*******
For those that do not know me, I am a pretty avid diyer (More so maybe before I had kids) Now when I diy, I do sometimes try to get them involved, you know, in the actual work. Truth – this usually produces mixed results. I mean – my little “princessitects” (Evyn – 8; Eva – 6) may have a knack and a passion for design, but for the “actual work”, they are unfortunately only good for about the first 30 minutes or so.
Ding Ding! *Light Bulb* Enter the perfectly scaled kid-friendly diy project.
*******
How To Turn a Trash Can into a Recycling Bin
Estimated time: 30 minutes
Skill Level: Beginner
Tools & Materials
30-gallon exterior-grade trash container, Stenciling Letters, Masking Tape, Spray Paint & a 24″ Bungee Cord.
Because of the nature of this project, I hoped that everything we used could be recycled. I also only wanted to use materials that I had already in my possession. Fortunately, I did have a set of of 3″ oil-board stencils sitting conveniently on my work bench. And while I considered purchasing a paint designed for plastics, we grabbed instead a can of RustOleum’s American Accents, one of many I have accumulated over the years. Eva picked Silver.
— Unpacking the letters, it was Eva’s job to spell out the word “Recycling”. (We ultimately learned it wouldn’t fit in the space we had and decided to go with just “Recycle.”)
— To start, I cleaned the surface using all-purpose cleaner.
— I then wrapped the can with a bungee cord. This served two purposes. It not only struck a straight line that we could use as a guide, it also helped temporarily hold the stencils in place as we fit and adjusted them prior to taping them down.
— We taped off with 3M’s ScotchBlue 2″ Delicate Surface Painters Tape. We did about three courses on each side of our block of lettering. (I used Delicate because that’s what I had lying around.)
— Between us, we sprayed two coats of paint across the lettering (trying to hold the can about 10″ above the surface and waiting about 10 minutes between coats).
— After about 10 minutes of dry time, we removed the stenciling. We realized quickly that we needed to “edit” a little; there was a little run. Note: I am not really certain what best practice is here, but my instinct was to quickly reach for Mineral Spirits. (I didn’t want to remove the tape so early as to smudge the freshly sprayed paint, but I wonder if I would have gotten to it sooner if it wouldn’t have worked out a bit better.) I made sure I was the only one here to touch the Mineral Spirits!
— Viola!
Lessons Learned
Six-year-olds are probably a little young for spray painting. My 8-year-old has all but mastered it (another project). Eva here not only couldn’t really grasp the concept of spraying in strokes, she also wasn’t really able to depress the spray tip that easily (probably not a bad thing).
All and all though, it was a quick and fun project that required minimal thought and planning. Plus we were able to pick all the waste we created right up and place it right into the bin. (Feeling good about ourselves.) It’ll be out on the curb this Friday, filled with stuff ready to be turned into something else.


AlexandraFunFit
18 Apr ’12 at 9:18 pmWow, Eva is growing up to be so tall. And what a fun project. They are going to have so many happy memories of doing fun projects with their dad. Please do a post with Evyn too!
Decor Girl
19 Apr ’12 at 4:53 amWell done. Eva is going to be very self-sufficient as an adult. Good job, JB!