A punch needle looks a lot more intimidating than it is. You see a photo of someone’s finished rug and think: I could never. But the truth is, punch needle is one of the more forgiving fiber crafts out there – mistakes pull out without leaving a trace, progress is visible almost immediately, and most kids figure out the basic motion in under ten minutes.
The catch? The kit matters. I’ve watched enthusiastic kids abandon a craft project by the third row because the yarn kept jamming, the fabric was too tight for their small hands, or they couldn’t figure out what the instructions meant. None of that has anything to do with talent. It has everything to do with the kit being wrong for a beginner.
This guide walks through the features that set a beginner-friendly punch needle kit apart from one that’ll end up in the back of a drawer. It’s written for parents buying for their kids – but honestly, it applies just as much if you’re brand new to this craft yourself.
1. Why punch needle works well for kids and beginners
Punch needle is a repetitive craft in the best sense. Each punch is one small, low-stakes action – and the result shows up right away as a loop on the surface of the fabric. For kids, that fast visual payoff is everything. They’re not waiting hours to see whether it’s working.
The craft is also genuinely forgiving. If a loop doesn’t look right, you pull it out and punch again. The fabric doesn’t tear, the yarn doesn’t fray, and nothing is ruined. That matters a lot for kids who are still building confidence with hand tools.
There’s also real developmental value here. A 2025 study published in the International Journal of Innovative Science and Research Technology (Kimi Kumari, Samuel Dinakaran S., and Harsha J.) found craft-based activities had a statistically significant effect on fine motor development in children – mean fine motor scores rose from 61.20 pre-intervention to 65.40 post-intervention, with a p-value of 0.001.
Separate research by Cinar et al., published in SAGE Journals in 2023, followed 832 children aged 6-7 and found that fine motor skills significantly predict vocabulary, number knowledge, and attention at school entry. Punch needle – with its precise hand positioning, grip control, and eye-hand coordination – sits squarely in that category of crafts that build these skills while kids are having fun.
If you want to see what’s currently available before committing to anything, browsing the best punch needle kits for beginners is a useful starting point – you’ll get a quick sense of how much variety exists in terms of project size, needle style, and what’s included.
2. Project size: start small, finish something
One of the most common mistakes I see is choosing a first punch-needle project that’s too big. A large or detailed design looks impressive on the packaging, but a beginner – especially a kid – needs to finish something before their enthusiasm runs out.
Aim for coaster-sized or single-motif designs. A 4-6 inch hoop is ideal for a first project. At that size, a child can complete the whole thing in one or two focused sessions. That finished piece – however simple – is a confidence builder. Kids who finish a small punch needle coaster almost always want to start a second one.
When you’re buying, look for kits that clearly state the finished project size. If the listing doesn’t mention dimensions, that’s worth noting. You don’t want to discover mid-project that you’ve signed up for a full-sized wall hanging. According to the PMC meta-analysis on fine motor skills and academic performance, repeated successful completion of hand skill tasks builds both motor memory and confidence, which is exactly the loop you want to create with a beginner.
3. The three parts that have to work together
Punch needle has three core components: the needle tool, the fabric, and the yarn. If these three aren’t matched to each other, the craft doesn’t work – and the beginner assumes they did something wrong.
Here’s what can go wrong when the components are mismatched. If the fabric’s weave is too tight, the needle meets too much resistance, and small hands tire out fast. If the weave is too loose, loops fall out as soon as you move the fabric. If the yarn is too thick for the needle gauge, it jams on every punch. Too thin, and the loops collapse on themselves rather than standing up on the fabric surface.
The safest option for beginners – kids especially – is a kit sold as a matched set, where the needle gauge, fabric type, and yarn weight are all designed to work together. If a kit asks you to buy the needle and fabric separately without any guidance on compatibility, that’s a red flag. You’re setting yourself up to troubleshoot a system’s problem before you’ve punched a single loop.
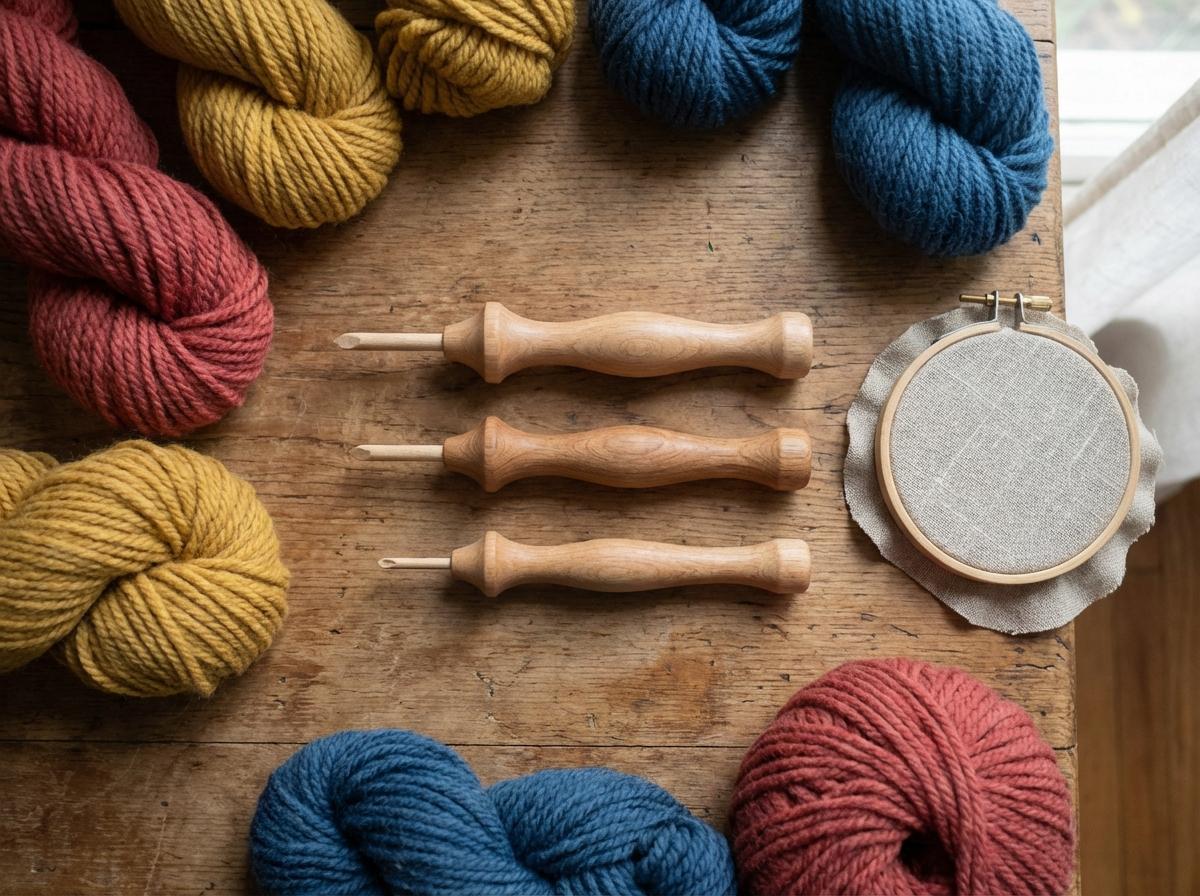
4. Needle type: fixed gauge for younger kids, adjustable for older ones
Punch needles come in two main types: fixed-gauge and adjustable. For kids under about ten, I’d go with a fixed-gauge needle every time.
Fixed-gauge needles do one thing and do it consistently. There’s no dial to fiddle with, no parts to loosen accidentally, and no confusion about settings. The loop height is set, you punch, it works. Adjustable needles let you change the pile height – great for creating texture and dimension, and genuinely useful as a crafter grows – but that extra functionality adds complexity that a young beginner doesn’t need on day one.
Handle matters too. Wooden-handled needles are easier for smaller hands to grip and more comfortable to hold for extended periods. Thin metal handles work fine for adults, but can be awkward for kids who are still developing grip strength. If you’re buying for a child under ten, look for a fixed gauge, a wooden or chunky handle, and a needle size that matches chunky or bulky yarn (thicker yarn moves faster and looks more impressive, which helps with motivation). For older kids and teens, an adjustable-gauge needle opens up more pattern possibilities and is worth the small added complexity.
5. Pre-printed patterns: skip the setup step
The moment between opening a kit and making your first punch is a barrier. If a beginner has to trace a pattern, transfer it to fabric, or draw guide lines before they can start, you’ve added a source of frustration that has nothing to do with the actual craft.
Pre-printed patterns solve this entirely. The design is already on the fabric. You thread the needle, find your starting point, and punch. That matters more than it sounds – especially for kids, who want to start the fun part, not the prep work.
When you’re evaluating whether a pattern is good for a beginner, look for bold, clear lines and well-defined color zones. Thin or faint printing is hard to follow, and fine-detail patterns are frustrating at the needle sizes most beginner kits include. The best kid-friendly patterns are simple shapes – animals, geometric repeats, food items – with areas large enough that the needle has room to move without constantly hitting a boundary.
Some kits include washable ink, which means the pattern lines disappear in the wash after the piece is finished. It’s a nice detail – it means the final piece looks clean rather than showing your guide marks.
6. Frame vs. hoop: how you hold the fabric
Fabric has to be pulled taut for the punch needle to work. If it sags or shifts, stitches won’t hold their shape. So how the fabric is held – and who’s holding it – is worth thinking about before you buy.
Hoops are lightweight, portable, and easy to reposition. The downside is that getting the tension right takes some practice, and hoops only work with round fabric sections, which limits the pattern size. For kids, readjusting tension mid-project is an interruption that breaks focus.
Pre-stretched wooden frames remove that problem completely. The fabric is already mounted and tensioned – you open the kit and start punching. There’s nothing to adjust. Finished pieces on a frame also go straight on the wall without any additional mounting, which is a satisfying result for a kid who just finished their first project.
For adults or older teens who want flexibility, a quality embroidery hoop with a tension screw offers greater control over fabric sizes and weights. But for younger beginners, I’d choose the pre-stretched frame kit every time. If you’re looking for more hands-on projects for kids that skip the complicated setup, the fun and easy DIY crafts for kids collection on this site is worth a browse.
7. Materials quality: what the yarn and fabric actually need to do
Not all kit yarn is the same. Cheap acrylic can split when pulled through the needle, leave fuzzy residue, and produce messy-looking loops that don’t hold their shape. A good beginner yarn is smooth, colorfast (it won’t bleed if the finished piece gets wet), and slides through the needle gauge cleanly.
On the fabric side, open-weave options like monk’s cloth or weavers’ cloth are the right choice for punch needle. They allow the needle to pass through with consistent resistance – not too tight, not too loose. A generic canvas is often too stiff, and the needle has to work harder through it, which is exhausting for small hands over any length of session.
The Craft Industry Alliance’s 2024 report found that 68% of crafters now prioritize sustainable materials when buying supplies – cotton and recycled-content options are more available in beginner kits than they were a few years ago. If eco-friendly materials matter to your family, they’re worth looking for specifically. Some of the better kits now highlight this in their descriptions.
For kids, there’s one extra thing to check: fiber texture. Scratchy or rough yarn makes holding the work for thirty minutes genuinely unpleasant. Smooth, soft fiber keeps the sensory experience comfortable, which means kids stay engaged longer.
8. Instructions: the part most buyers overlook
Good instructions are worth more than most product descriptions suggest. A kit can have matched components, a pre-printed pattern, and quality yarn – and still fail a beginner if the instruction sheet doesn’t explain clearly how to start a new color or what to do when loops start falling out.
Look for numbered steps with photos or diagrams. Written-only instructions leave too much to interpretation, and a frustrated child who can’t figure out what step 3 means will put the kit down. The best instructions also include a short troubleshooting section – “if loops fall out, check fabric tension” is the kind of note that saves a first-time puncher from assuming they’ve broken something.
Some kits include a QR code linking to a video tutorial, which is genuinely useful for kids who learn better by watching than reading. If the kit is for a child who’ll be working somewhat independently, that video link can replace the need for a parent to be involved at every step.
For a broader idea of hands-on projects that hold kids’ attention without overwhelming them, the simple DIY projects to keep kids engaged at home are a good reference point for gauging the right difficulty level.
Picking the kit that matches your actual situation
The best punch needle kit for a beginner isn’t the most expensive one on the market or the most-reviewed option. It’s the one that matches the specific person who’s going to use it – their age, their patience level, and the kind of project they’re actually excited to make.
For kids under eight, that means: a small pre-stretched frame kit, a fixed-gauge needle with a chunky grip, a bold, simple pattern in a 4-5 inch design, and chunky yarn that builds up fast. For older kids and teens, an adjustable-gauge needle and a hoop-based kit with a few pattern choices gives room to grow. For adults new to punch needle, a matched all-in-one set with video support and an intermediate-sized project is the sweet spot.
The first finished punch needle piece has a way of selling people on the craft entirely. It’s satisfying in a specific way – textured, quick, and genuinely handmade-looking – and most kids want to start a second project before the first one is even off the frame. Getting the kit right is what makes that first experience possible.