Just when you thought you had figured out every use for duct tape, another creative person shows you something new and this time its not what you’d expect.
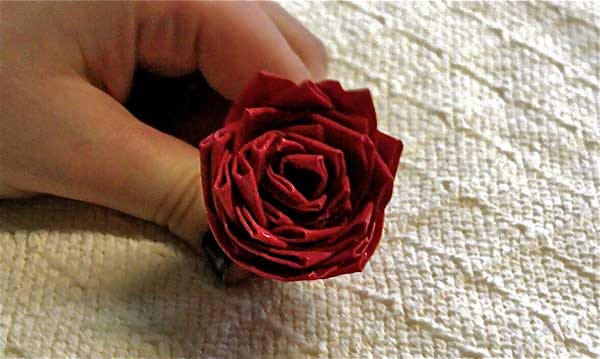
Duct tape is the most utilitarian item we have and is great for sealing, covering, fixing or masking but not typically thought of when it comes to something of beauty of charm. Well Kathy Fuller and her daughter Zoie have changed that as they just submitted this project that turns duct tape into a rose.
My thirteen year-old daughter, Zoie, loves art. Near the end of summer she started getting bored (as kids tend to do) so I enrolled her in a duct tape art class at a local fine arts center. From the first day she was hooked. She’s been making duct tape creations ever since, and has even sold a few of her items to friends and classmates.
Cost: The cost of duct tape ranges depending on where you purchase it, but one roll usually costs between four and six dollars. One roll of tape will yield about four flowers, less or more depending on the size of the squares and the number of squares used in each flower.
Time: You can spend five minutes making a duct tape flower, or you can spend an hour. It all depends on how large the flower is and the complexity of the design. This is a great activity to do on a long car trip, during a wait in the doctor’s office, or when you’re bored and need something to keep you busy. All you need is tape and your hands.
Materials: Duct tape. This can be purchased at any hardware or discount store. If you prefer to shop online, visit www.findtape.com. Scissors are optional, but recommended for younger kids. Make sure to use safety scissors for preschool and early-elementary age children.
With the wide variety of colors and patterns available, duct tape art is limited only by the artist’s imagination. Flowers are one of the easiest projects to make. Here is a step-by-step guide to creating a rose out of duct tape.
[nggallery id=14]
Step One: Tear a five to six-inch length of tape off the roll. You can also use scissors to cut the tape.
Step Two: Tear (or cut) the strip into squares. Repeat until you have a total of thirty squares. The squares don’t have to be perfect. It’s more interesting if some squares are a little larger than others.
Step Three: Pick up a square. Hold it sticky side up. Fold the bottom left hand corner upward so the point touches the center of the square. Then fold the bottom right corner upward in the same way. Press down on the seams to smooth them out.
Step Four: Repeat with the rest of the squares.
Step Five: Take a pointed square. Hold it sticky side up and with the pointed end pointing up. Starting with the right side, roll it toward the left three or four times, then press down the tape. This is your starting petal.
Step Six: Continue adding petals to your starting petal. Take another square, again holding it sticky side up and with the pointed end pointing up. Attach the edge of the square to the side of the starting petal and roll it over the starting petal. When you’ve added several squares, your flower will start to take shape.
Step Seven: Add the rest of the squares, using the same technique. After adding the final square, press and smooth the seam. If there is extra tape at the bottom of your flower, twist it closed.
Don’t be afraid to experiment with different colors and patterns. Every flower will be unique. The more squares you add, the larger the flower grows.
You can also use the flowers to decorate objects. Zoie taped this flower to one of her pens. You can make small flowers with five tiny squares, or gigantic ones with over 100 squares.


Ebdaly
11 Nov ’11 at 4:08 pmGood job, Zoie… I am enjoying the Yellow Rose that you made for me. It is truly amazing what you can do with Duct Tape!!!
Karla Hanns
11 Nov ’11 at 4:22 pmBeautiful roses. WOW!! And just with duct tape. Quite an art!!
Pauline Crawford
11 Nov ’11 at 7:44 pmBeautiful! You wouldn’t think Duct tape looking at them. Need to give this a try…
swerdft
7 Jan ’12 at 9:49 pmI love these. They are so cool. I’m bout to try this