Here’s how to build a homemade volcano for explosive fun. Whether you’re a curious kid or an adult looking for a hands-on science project, this step-by-step guide will take you through the process of creating your very own volcanic eruption.
Understanding the Science Behind Volcanoes
Before we dive into the construction of our homemade volcano, let’s take a moment to understand the science behind these fascinating natural phenomena. Volcanoes are essentially openings in the Earth’s crust that allow molten rock, known as magma, and gases to escape from deep within the planet’s core.
But what exactly happens beneath the Earth’s surface to create these fiery spectacles? It all begins with the formation of magma. Intense heat and pressure cause rocks to melt deep underground, forming a molten rock substance. This magma is incredibly hot, reaching temperatures of up to 2,200 degrees Fahrenheit (1,200 degrees Celsius).
The Role of Magma and Gas
As this molten rock rises to the surface, it carries with it a multitude of gases. These gases, such as water vapor, carbon dioxide, and sulfur dioxide, become trapped within the magma as it makes its way towards the volcano’s opening. The pressure within the magma chamber increases as more gas gets trapped, creating a volatile environment.
Imagine a bottle of soda that has been shaken vigorously. The carbon dioxide gas inside the bottle builds up pressure until it forces its way out when the cap is opened. Similarly, the trapped gases within the magma chamber build up pressure until they find a way to escape through the volcano’s opening, resulting in an explosive eruption.
The Different Types of Volcanoes
Volcanoes come in various shapes and sizes, each with its own characteristics. Some are shield volcanoes, which have broad, gently sloping sides, and are formed by the accumulation of thin layers of lava flowing from multiple vents. These types of volcanoes are typically found in areas with low viscosity magma, allowing the lava to flow easily.
On the other hand, stratovolcanoes are characterized by steep slopes and explosive eruptions. These volcanoes are formed by alternating layers of lava, ash, and other volcanic materials. The eruptions of stratovolcanoes are often violent and can produce pyroclastic flows, which are fast-moving currents of hot gas and volcanic matter.
Understanding these different types of volcanoes is crucial when it comes to designing our homemade volcano. By incorporating the characteristics of the specific volcano we want to replicate, we can create a more accurate and realistic model that showcases the unique features and eruption style of that particular type of volcano.
Gathering Your Materials for the Experiment
Now that we have a basic understanding of volcanoes, let’s gather the materials we’ll need for our DIY project.
But before we dive into the exciting world of volcanic eruptions, let’s take a moment to explore the fascinating history of volcanoes. Did you know that the word “volcano” originates from Vulcan, the Roman god of fire? Volcanoes have been a source of wonder and awe for centuries, captivating the imagination of both scientists and ordinary people alike.
Now, armed with this newfound knowledge, let’s move on to the materials we’ll need to create our very own volcanic masterpiece.
Household Items You Can Use
You don’t need specialized equipment to build your homemade volcano. Simple household items can serve as the building blocks of your eruption masterpiece. An empty plastic soda bottle, newspaper, masking tape, and flour are just a few things you can use to create a fantastic volcano structure.
But why stop at just these items? Let your creativity run wild and explore other materials that could add an extra touch of authenticity to your volcano. Perhaps some colored paints to mimic the fiery lava or small rocks to create a realistic volcanic landscape. The possibilities are endless!
Safety Equipment Needed
It’s essential to prioritize safety during our experiment. After all, while we want to have fun, we must also ensure that everyone involved remains safe and protected.
To safeguard our eyes from any potential hazards, we’ll need to wear protective goggles. These will shield our eyes from any flying debris or splashes that may occur during the eruption. Additionally, gloves will protect our hands from any chemicals or heat that may be involved in the process.
Lastly, let’s not forget about our attire. While it may be tempting to wear our favorite clothes, it’s best to opt for a smock or old clothes that we don’t mind getting messy. Volcanic eruptions can be messy affairs, and it’s better to be prepared than to ruin our favorite outfit!
Oh, and one more thing! We’ll need a large pan or tray to catch any potential spills during the eruption. This will help contain the excitement within a controlled area, making the cleanup process much easier.
Now that we have our materials and safety equipment ready, we can proceed to the next step of our volcanic adventure. Get ready to witness the power and beauty of a homemade eruption!
Step-by-Step Guide to Building Your Homemade Volcano
Now that we have all our materials ready, let’s begin constructing our homemade volcano step by step.
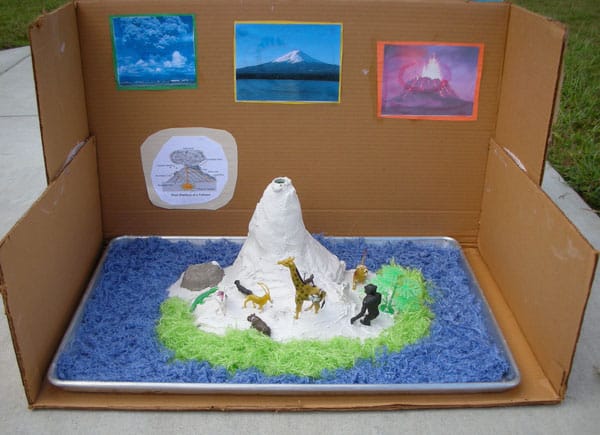
Creating the Volcano Structure
Start by placing the empty plastic soda bottle in the center of your workspace. Use crumpled newspaper to form the shape of the volcano around the bottle, securing it with masking tape. Be creative with the contours and slopes of your volcano, mimicking the appearance of real volcanic mountains.
As you mold the newspaper, think about the different types of volcanoes that exist in nature. You can create a stratovolcano, known for its steep sides and explosive eruptions, or a shield volcano, characterized by gentle slopes and slow lava flows. The choice is yours, and this is where your artistic skills can shine!
Mixing the ‘Lava’ Solution
In a separate bowl, mix together two cups of flour, one cup of water, one cup of salt, and a few drops of food coloring to create a thick, lava-like solution. Adjust the consistency by adding more flour or water as needed. This mixture will represent the magma that will flow out of the volcano during the eruption.
Now, let’s dive deeper into the science behind this lava-like solution. The flour acts as the main ingredient, giving the mixture its thick and gooey texture. When combined with water, the flour forms a sticky paste that closely resembles the consistency of real lava. The addition of salt helps to enhance the viscosity, making the lava flow more convincingly. And of course, the food coloring adds a touch of realism, allowing you to choose the color of your volcanic eruption. Will it be a vibrant red, symbolizing a fiery explosion, or a deep black, representing a more ominous and mysterious event?
The Eruption: What to Expect
With our volcano structure and lava solution ready, it’s time for the thrilling moment when we trigger our eruption.
But before we dive into the excitement, let’s take a closer look at the chemical reaction that will make this eruption possible.
The Chemical Reaction Explained
When we add a few tablespoons of baking soda to the bottle’s opening, followed by a cup of vinegar, a fascinating chemical reaction will occur. It’s like witnessing a miniature fireworks display right in your own backyard!
The vinegar, which is an acid, reacts with the baking soda, a base, producing carbon dioxide gas. This reaction is known as an acid-base reaction, and it’s the key to creating the eruption effect. As the carbon dioxide gas rapidly builds up pressure inside the bottle, it creates a sense of anticipation, just like the rumbling of a real volcano.
And then, suddenly, the mixture overflows, mimicking the eruption of our volcano. It’s a sight to behold as the lava-like mixture cascades down the sides of the volcano structure, leaving a trail of excitement in its wake.
Cleanup and Reuse of Your Volcano
After the eruption, it’s essential to clean up any spilled mixture promptly. While the eruption may be over, it’s crucial to maintain a safe and tidy environment for future experiments.
Take a moment to wipe down the volcano structure, removing any residue left behind by the eruption. This not only keeps your volcano looking pristine but also ensures that it’s ready for its next adventure.
Dispose of any used materials properly, following the guidelines for your local waste management. By doing so, you contribute to a cleaner and healthier environment for everyone.
Remember, you can always reuse and remodel your volcano for future experiments! Let your creativity flow as you explore different ways to simulate volcanic eruptions. Whether it’s adjusting the lava solution or experimenting with different eruption triggers, the possibilities are endless.
So, get ready for more thrilling eruptions and scientific discoveries as you continue your journey into the fascinating world of volcanoes!
Additional Fun Science Facts About Volcanoes
Now that we’ve successfully created our homemade volcano, let’s explore some additional fun science facts about these awe-inspiring natural wonders.
Famous Volcanic Eruptions in History
Throughout history, several major volcanic eruptions have left a significant impact. Mount Vesuvius’ eruption in AD 79, which buried the Roman cities of Pompeii and Herculaneum, is one of the most famous examples. These eruptions serve as a reminder of the power and unpredictability of nature.
The Impact of Volcanoes on the Environment
Volcanic eruptions can have both short-term and long-term effects on the environment. They release large amounts of ash and gases into the atmosphere, which can cause temporary climate changes and affect air quality. However, volcanoes also play a vital role in the formation of new land and the recycling of Earth’s elements.
Now armed with knowledge about the science behind volcanoes and armed with the instructions to construct your own homemade volcano, you’re ready for a thrilling DIY science experiment. So gather your materials, put on your safety gear, and get ready to witness an explosive volcanic eruption right in your own home!