In this article, we will explore the process of building a DIY indoor fort. Whether you want a cozy place to relax or a fun hideout for your kids, an indoor fort can provide hours of enjoyment.
We will discuss the basics of fort building, from understanding the importance of a solid foundation to choosing the right materials. Additionally, we will guide you through planning your fort’s size and location, as well as sketching a blueprint that suits your needs.
Understanding the Basics of Fort Building
Before you embark on your fort-building journey, it’s essential to understand the basics. One crucial aspect is the foundation. The foundation provides stability and support for your fort, ensuring it remains standing. Whether you choose to build on carpeted floors or hardwood surfaces, make sure to clear the area of any obstacles that could disrupt the fort’s stability.
Another important consideration when building a fort is the materials you will use. While you may be tempted to grab the nearest blanket or sheet, it’s important to choose durable and safe materials. Thick blankets or bed sheets can provide better support and ensure that your fort withstands multiple adventures. Additionally, using clothespins or clamps to secure the materials is an excellent way to ensure stability.
When selecting a location for your fort, consider the surroundings. Opt for a spot away from high-traffic areas to minimize the risk of accidental collisions that could bring down your masterpiece. Natural light can add a cozy ambiance to your fort, so positioning it near a window might be a good idea. However, be mindful of direct sunlight, as it can make your fort uncomfortably warm.
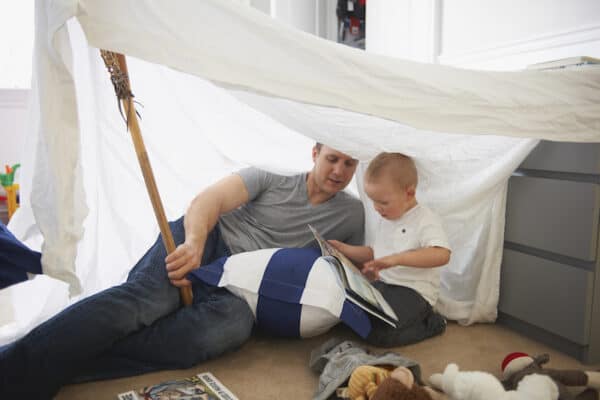
Furthermore, don’t underestimate the power of creativity when it comes to fort building. One reason why indoor forts are so much fun for children is that they inherently involve creativity and imagination.
Indeed, there have been many instances where parents have used indoor forts to create mini reading corners for their kids, where they engage in role-playing activities with imaginative play toys which helps them expand on the stories they create while inside the fort.
Incorporating pillows, cushions, and even furniture into your fort can enhance its comfort and aesthetic appeal. Creating different sections within the fort, such as a reading nook or a snack area, can make it a versatile space for various activities.

Planning Your Indoor Fort
Planning is a crucial step in building a successful indoor fort. Start by determining the size and location of your fort. Consider the available space and the purpose of the fort. Do you want a small reading nook or a spacious retreat? Keep in mind that the fort should be large enough to accommodate the intended users comfortably.
Next, sketch a blueprint of your fort. This will serve as your guide during the construction process. Consider the shape and design of the fort, making sure to incorporate elements that will enhance its functionality and aesthetic appeal. The blueprint will help you stay organized and focused as you bring your fort to life.
When selecting materials for your indoor fort, think about both durability and comfort. You want your fort to be sturdy enough to withstand playful adventures, yet cozy enough to encourage relaxation. Soft blankets, fluffy pillows, and twinkling fairy lights can add a magical touch to your fort, creating a cozy atmosphere that beckons you inside.
Don’t forget to personalize your indoor fort with decorations that reflect your style and interests. Whether you choose to adorn the walls with colorful drawings, hang up string lights for a warm glow, or add a canopy for a touch of elegance, these personal touches will make your fort feel like a special retreat tailored just for you.
Gathering Your Building Supplies
Once you have a plan in place, it’s time to gather your building supplies. Start with the essentials for construction. These may include large blankets or sheets, sturdy chairs or furniture, and plenty of clips or clamps for securing the materials. Ensure that the materials you choose are safe for use and free of any potential hazards.
Safety is paramount when building an indoor fort. Therefore, make sure to have the necessary safety equipment on hand. This may include a first aid kit, a flashlight, and a fire extinguisher. It’s always better to be prepared and prioritize safety, especially when constructing a fort that will be used by children.
Additionally, consider adding some decorative elements to your indoor fort to make it cozy and inviting. You could include fairy lights, throw pillows, or even a small rug to create a comfortable space. Adding a touch of personal flair to your fort can make it feel more special and enjoyable to spend time in.
Don’t forget about entertainment options for your fort. Depending on the age group of the fort’s occupants, you may want to include books, board games, or a tablet for watching movies. Creating a fun and engaging environment within the fort will make it a popular spot for relaxation and play.
Constructing Your Indoor Fort
Now that you have everything you need, it’s time to start building your indoor fort! Follow this step-by-step guide to ensure a successful construction process.
Step 1: Building the Base
Begin by selecting a suitable location for your fort. Lay down a soft base, such as a large blanket or comforter, to create a comfortable surface. Use chairs, furniture, or other stable objects to anchor the corners of the base. This will provide stability and prevent the fort from collapsing during use.
Ensure that the base is secure and stable before moving on to the next step. Test the fort’s stability by gently shaking the structure and making any necessary adjustments. Remember, a sturdy base is the foundation for a successful fort construction.
Step 2: Adding Walls and Roof to Your Fort
Once the base is set, it’s time to add walls and a roof to your fort. Use additional blankets or sheets to create walls by draping them over the chairs or furniture. Secure them in place using clips or clamps. Be creative with the design, considering factors such as height and accessibility.
Complete your fort by adding a roof. Utilize blankets or sheets that will cover the top of your fort securely. Ensure that it overlaps with the walls to create a cozy and enclosed space. Take the time to adjust and refine the structure until you achieve the desired result.
Decorating and Personalizing Your Fort
Now that your fort is complete, it’s time to add the finishing touches. Decorating and personalizing your fort can be a fun and exciting process that enhances the overall experience. Consider these creative ideas for fort decorations:
- Hang string lights or fairy lights to create a magical ambiance.
- Add pillows, cushions, and blankets for cozy seating and lounging.
- Use colorful tape or fabric to create a unique design or pattern on the walls.
- Hang artwork or posters inside the fort to personalize it.
In addition to decorations, making your fort comfortable is essential. Include soft seating options and consider adding a small table for snacks or activities. Make the space inviting and cozy, providing a retreat where you can relax and enjoy some downtime.
Making Your Fort Comfortable
To make your fort more comfortable, consider the following:
- Add plush blankets and pillows for extra coziness.
- Provide books, magazines, or handheld games for entertainment.
- Place a rug or carpet on the floor to create a soft and inviting surface.
- Include a small portable fan or heater to ensure the fort is at a comfortable temperature year-round.
Remember, the key to personalizing your fort is to cater to your specific tastes and needs. Add decorations and amenities that will make your fort a unique and enjoyable space.
Building a DIY indoor fort can be a rewarding and delightful experience. From understanding the basics of fort building to planning, constructing, and personalizing your creation, each step plays a crucial role in the final outcome. Take your time, be creative, and enjoy the process of building your very own indoor fort.