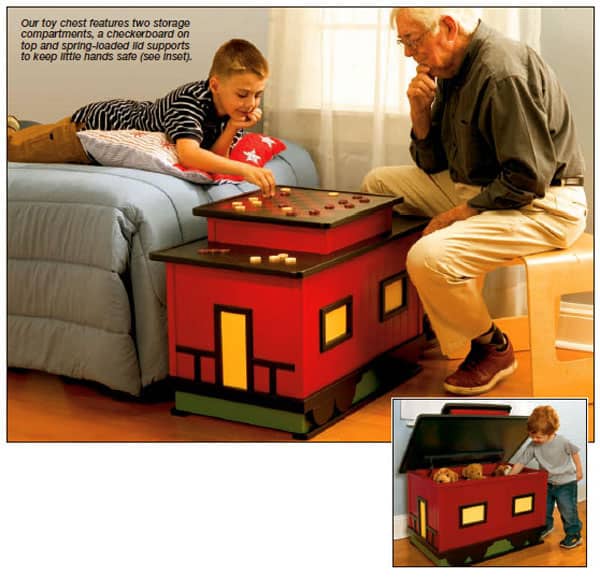
We’ve got a lot of friends whose boys love Thomas the Train and can’t get enough of it. You can build them this train toy chest and they’ll be happy forever (or at least until they outgrow the train phase). This toy chest resembles a caboose but you could modify it to look like Thomas the Train. This project is geared more towards the intermediate/advanced woodworker so making changes to this plan shouldn’t be difficult.
This project was designed by our good friend Dan Cary and was shared with our readers courtesy of the Handyman Club.
Designed to maximize practicality, the caboose features storage for small items such as game pieces in the cupola (the elevated top section characteristic of many cabooses) and a painted checkerboard on top for use as a game board. Although the various trim pieces make the cutting list long, the project isn’t difficult. You’ll mill the trim pieces and then cut them to size.
The most time-consuming aspect of the project is the multicolor paint scheme – you’ll need to paint different-color parts before assembly. To simplify painting, build the boxes, lids and trim pieces separately; then paint and assemble them.
Of course, you can adapt the color scheme to suit the room’s decor – or even forgo the caboose theme and build a simpler toy box.
View the full materials and cut list
Build the boxes
The basis of this design is two boxes made of 1/2-in.-thick plywood. Because panels and trim pieces cover the boxes,
I kept the construction simple, using butt joints and screws at each corner. The bottom of the main box rests in dadoes located in the front and back pieces. I cut each 1/4-in.-deep x 1/2-in.-wide dado on a router table equipped with a 1/2-in. straight bit and assembled the main and top box parts with glue and 1-1/4-in. screws.
Corner blocks give the main box additional strength. I cut the corner blocks from an 18-in. section of a 2×4 that was straight and free of knots. I beveled the corner blocks on the table saw and then fastened them to the inside of the main box with glue and 1-1/4-in. brad nails.
To mimic the look of vertical board siding, I used 3/16-in.-thick primed beadboard for the panels. I cut the door and window openings in each panel with a jigsaw and then fastened the panels to the main and top boxes with glue and 5/8-in. brads. You’ll need to locate the brads near the edges of the panels so that the trim pieces will cover them.
Use a router table or table saw to cut the groove in the box-cap moldings. Miter the box caps to fit each side of the top and main boxes. Do your best to keep the miters tight, but don’t worry if they’re not perfect – you can easily fill gaps as wide as 1/8 in. with wood putty or spackle before painting. Once you’ve cut the miters, fasten the box caps with glue and 1-1/4-in. brads.
Corner moldings, available at most home centers, protect the corners and cover the exposed beadboard panel joint. Fasten the corner moldings with wood glue and 1-in. brads.
Build the lids
The edges of the 1/2-in. plywood lids are wrapped with poplar edge molding. Cut the groove in the lid edging using the same method that you used to cut the channel in the top cap molding. Miter the lid edging to fit around both lids. Fasten the edging with glue and 1-in. brads. Keep the brads centered on the lid edging and at least 1-1/2 in. away from the corners.
Sharp corners on children’s furniture are a safety hazard, so be sure to round off the lid corners using a jigsaw or band saw. Then round over all edges using a router and 3/16-in.-dia. Roundover Bit.
To keep little fingers safe, the lids are supported by spring-loaded hardware that provides resistance when the lid is opened or closed. These supports should be fastened to solid stock. Glue the large- and small-lid support cleats to the inside of the lids and to the inside faces of the back of both boxes. Then drill pilot holes in the top-box cleats and attach them to the top box with glue and 1-1/4-in. screws.
Make the trim details
Because the wheel pieces are not functional, they don’t need to be perfectly round. Rather than draw eight half-circles on the edge of a piece of stock, I drew four 2-1/2-in.-dia. circles in the center of a 24-in.-long piece of 1×6 poplar. Then I ripped the 1×6 down the middle, cut out the eight half circles with a jigsaw and sanded them smooth.
The wheel guards and window and door trim conceal the beadboard panel edges. I milled these molding pieces on the router table.
To create the railings and balusters, rip 1/4-in.-wide strips of poplar from 3/4-in.-thick stock. Leave all of these moldings in long pieces until after painting. Sand all surfaces smooth, easing any sharp edges.
Paint the parts
For maximum glue adhesion you shouldn’t paint surfaces that will be glued, so use 1/2-in.-wide masking tape to cover the future locations of trim pieces on the main box. Likewise, do not paint the corresponding back of the trim pieces. (This also leaves one dry face for the trim pieces to rest on while the painted faces are drying.)
Apply one coat of wood primer to all surfaces that will be painted. After the primer dries, sand the surfaces lightly and apply at least two coats of satin or semigloss latex paint, sanding lightly between coats. I added Flood Floetrol paint conditioner to help the paint flow on more evenly and dry to a smoother finish. You’ll need only two or three coats of black, green and yellow paint, but the red paint will require at least four coats.
Assemble the caboose
When the paint is dry, you’re ready to begin the final assembly. Cut each trim piece to fit. Miter the wheel guards and window and door trim pieces. Cut the railings and balusters, and secure the trim with glue and 1-in. brad nails. Drill pilot holes through the rails and attach them to the bottom of the box with 1-1/4-in. screws.
To attach the large lid, first fasten a pair of hinges to it. With a helper holding the lid in position, fasten the hinges and the lid to the main box. Attach the lid supports to the large-lid support cleats. Next, attach the top box to the large lid with 1-1/4-in. screws. Attach the hinges and a lid support to the small lid and top box just as you did with the large lid.
The final step is to fill any exposed nail holes with paintable wood putty or spackle and then touch up the paint. To give the finish additional protection, apply two coats of clear polyurethane (spray cans work well) to the entire toy chest.
SOURCES
The Flood Co. (Floetrol), 800-321-3444
Woodcraft (hinges and lid supports), 800-535-4482
[nggallery id=20 template=carousel]
STEP-BY-STEP INSTRUCTIONS
Step 1: Tilt the blade to 45 degrees and position the fence opposite the blade tilt direction. Keep the small beveled corner block piece on the outside of the blade, away from the fence, to prevent kickback. Tilt the blade back to vertical to cut the next piece.
Step 2: Assemble the boxes with glue and 1-1/4-in. screws. Attach the corner blocks to the main box with glue and 1-1/4-in. brad nails.
Step 3: Assemble the boxes with glue and 1-1/4-in. screws. Attach the corner blocks to the main box with glue and 1-1/4-in. brad nails.
Step 4: Use a router and 3/16-in. roundover bit to profile the lid edges. A scrap of 1/8-in.-thick hardboard keeps the router base level.
Step 5: Gang cut the wheel halves with a jigsaw. Cut just outside the line and then sand back to the line.
Step 6: Attach trim pieces with glue and 1-in. brad nails. Fill the nail holes with spackle. Drive one upholstery tack in the box cap near each front corner to keep the lid
from sticking to the box.
Step 7: Install the spring-loaded lid supports. These supports provide resistance when you open and close the lid. Various spring strengths are available to accommodate different lid weights.


